My sister Dizzi, as she does, came up with a new and exciting problem for me to solve. I love when this happens. Really. Well, kind of. After I solve it, if not before. And this one is about rotations, my favorite scripting foe.
Here’s the deal. Dizzi has started building rides, like roller coasters, in Blender. And she’s found this really cool way of doing it. I’m not a blender expert, so this may not be exact, but basically she builds a Bezier curved path, twists it around, then clones a track element onto the bezier, voila! building a nice twisty coaster ride. The trick is to export the route or path information.
Now our rides mostly have their route memorized, inside the script or in a notecard. The usual form is a list of points. Rides with banking have a list of points, and a list of angles of roll for the vehicle. But Dizzi couldn’t export that. Let’s look at what she had in Blender:


In those pictures, you can see the coaster track, but also a line of triangles. What Dizzi is doing is exporting her build from Blender, then editing the DAE file and pulling out the data we need for the route. The bottom corners of the triangles are the points along the route. But the coaster wants to bank, as you can see in those pictures. The problem was to export the twisting of the curve as well as its points. So we tried making those shark-fin triangles to see if it would export the top point as well. It didn’t. Instead it exported “normals”.
Do you see the little blue lines coming out of the triangles? Those are “normals”, vectors that are perpendicular to the faces of the triangles. They happen to be perpendicular to the side of the triangle that will be the positive Y side of our vehicles, which run with +X forward. So Dizzi can extract two sets of points from the DAE file, the path points, and the normals. The path points are vectors in Blender’s three dimensional space, just a list of points that we can scale and use as our path. That part’s easy. The other set of points is just a bunch of random-looking vectors representing the angle of a particular triangle. My job is to convert those to something our scripts can use to compute the roll angle of the vehicle as it goes around the track.
I don’t remember if the angle in our scripts is degrees or radians or what. As I write this, I see that I should have asked, because it might have made this problem easier. Anyway, I’ll report here what I did, in my usual hope that it’ll be useful. It turned out to be simple, but not easy to figure out, at least not for me. So here’s our starting point:
From Blender, Dizzi can export a set of path points, as usual, every so often along the path. And she can export those blue “Normals”. Since that’s the positive Y side of the vehicle, and the official word for perpendicular is “normal”, I’m calling the data that I get the “y-face-normal”. Sorry, there’s math in my background.
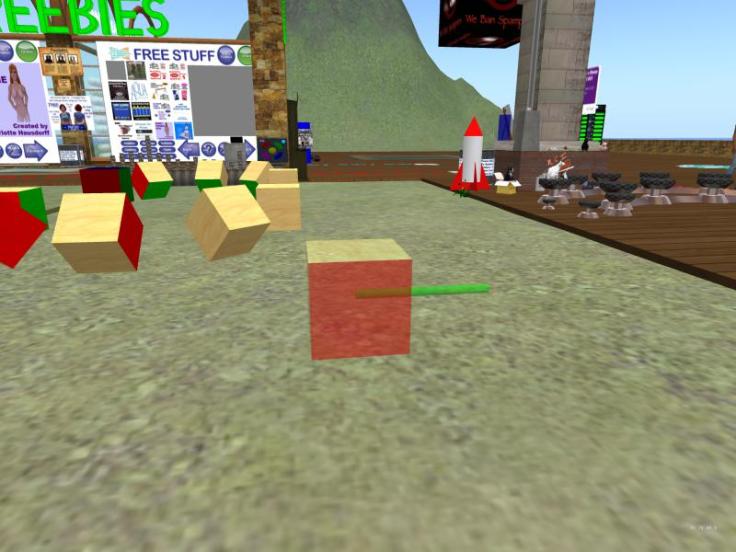
Rather than work with a set of points and normals from Dizzi, which look like random data to me, I decided to start with a very simple construction with points and angles I could understand. Here’s a picture:

That ring of boxes is what I used to generate test data. The red face on the box is +X, the green is +Y. I have no explanation for how I picked those colors. I laid the boxes out on the grid, so most of them are on even coordinates. I aimed the X faces along the track, and since the ones on the curve are pretty much halfway around, I aimed them at exactly 45 degrees. Then I rotated the curve ones around their local X axis (the roll axis), also 45 degrees down, banking inward as one does.
I used these exact values for a good reason, and with some risk. The good reason is that when I manage to make my vehicle follow the path, it will be easy to see whether I have the right answer, because it should come out “even”. The risk is that I might accidentally build 45 degrees into my script, and it might not work in the general case. Since I was aware of the risk, and since I mostly don’t make that particular kind of mistake, I was comfortable with this as my test track.
Each box has a script in it, so that when I touch the green face, it displays the box position, and the normal vector for that face, like this:
default { touch_start(integer num_detected) { if ( llDetectedKey(0) != llGetOwner() ) return; vector pos = llGetPos(); vector norm = llDetectedTouchNormal(0); llOwnerSay(llDumpList2String([pos,norm], ", ")); } }I collected up all that information, by clicking the boxes in order, getting this data set:
// Position Face Normal (+y) list pos_face = [ <71.000000, 147.000000, 27.609870>, < 0.000000, 1.000000, 0.000000>, <74.000000, 147.000000, 27.609870>, < 0.000000, 1.000000, 0.000000>, <75.061110, 147.413400, 27.609870>, <-0.500000, 0.500000, -0.707107>, <75.500000, 148.500000, 27.609870>, <-0.707107, 0.000000, -0.707107>, /* top */ <75.065950, 149.522400, 27.609870>, <-0.500000, -0.500000, -0.707107>, <74.000000, 150.000000, 27.609870>, < 0.000000, -1.000000, 0.000000>, <71.000000, 150.000000, 27.609870>, < 0.000000, -1.000000, 0.000000>, <69.960240, 149.522400, 27.609870>, < 0.500000, -0.500000, -0.707107>, <69.500000, 148.500000, 27.609870>, < 0.707107, 0.000000, -0.707107>, /* bottom */ <69.960240, 147.432400, 27.609870>, < 0.500034, 0.499966, -0.707107> /*, <71.000000, 147.000000, 27.609870>, < 0.000000, 1.000000, 0.000000> */ ];That looked good to me, so I got started. I began with a script that just moved a cube to each of those locations in sequence, when I clicked it. I used
llSetPosin that first one. That worked fine. In the final script, which I’ll start showing soon, you’ll see where that was going on.Soon, I found the need to work at home, though I had started in Kuula. That meant that I needed different coordinates for home and for Kuula. My plan was: make my data zero-based, then add in the starting location at the last minute. If I were building a general purpose tool I’d have gone all out on this but since this is just a test rig, I decided I’d just convert the data on the fly, and put the starting location in by hand. I didn’t anticipate moving the rig very often.
The code to do that is still in my script, and it looks like this:
// move-face-normal // JR 2018-09-11 // move given point, y-face-normal info // Position Face Normal (+y) list pos_face = [ <71.000000, 147.000000, 27.609870>, < 0.000000, 1.000000, 0.000000>, <74.000000, 147.000000, 27.609870>, < 0.000000, 1.000000, 0.000000>, <75.061110, 147.413400, 27.609870>, <-0.500000, 0.500000, -0.707107>, <75.500000, 148.500000, 27.609870>, <-0.707107, 0.000000, -0.707107>, /* top */ <75.065950, 149.522400, 27.609870>, <-0.500000, -0.500000, -0.707107>, <74.000000, 150.000000, 27.609870>, < 0.000000, -1.000000, 0.000000>, <71.000000, 150.000000, 27.609870>, < 0.000000, -1.000000, 0.000000>, <69.960240, 149.522400, 27.609870>, < 0.500000, -0.500000, -0.707107>, <69.500000, 148.500000, 27.609870>, < 0.707107, 0.000000, -0.707107>, /* bottom */ <69.960240, 147.432400, 27.609870>, < 0.500034, 0.499966, -0.707107> /*, <71.000000, 147.000000, 27.609870>, < 0.000000, 1.000000, 0.000000> */ ]; list adjusted; // vector start = <175.000000, 166.000000, 42.000000>; vector start = <67.000000, 146.000000, 28.000000>; integer position; list adjust_list(list pf) { list result; vector delete = llList2Vector(pf, 0); integer i; integer n = llGetListLength(pf); for (i = 0; i < n; i += 2) { result += llList2Vector(pf, i) - delete; result += llList2Vector(pf, i+1); } return result; } // ... state_entry() { adjusted = adjust_list(pos_face); llOwnerSay("still ready"); position = 0; move_to_pos(position); } //...There we see my original data (with the duplicate end point commented out), and a new list,
adjusted, for the zero-based information. I did print that once to be sure it was working.I chose to have an integer
positionthat goes around the list, and wrote a functionmove_to_posto do the moving. Originally, that looked like this:move_to_pos(integer to) { vector target = get_vec(to); llSetPos(target); }And
get_vecevolved into this, though I wrote it inline to begin with:vector get_vec(integer i ) { return llList2Vector(adjusted, get_index(i)); } integer get_index(integer i) { integer N = llGetListLength(adjusted); integer fetch = 2*i; if (fetch < 0 ) fetch += N; fetch = fetch%N; return fetch; }All that stuff in
get_indexis handling wrapping around, so that I can just keep incrementing position willy-nilly. I could have gone another way. This is the one I chose. It’s horrible but it works: it keeps position between 0 and N-1, no matter how it comes in. You may be wondering why it has to deal with negative indexes. That will come up later.Normally, I’d try to make
get_indexnicer, but all this is a test harness, and so I’m tolerating somewhat less well-factored code than I would in production. I’m just trying to get to where I can solve the problem, which is to roll the cube to math the track.Seeing what we need
Let’s talk a moment about what really needs to go on. Here are a couple of pictures to help see what’s up:
The picture above shows a transparent cube with a y-face normal sticking out. The cube is oriented straight up and is aligned with the region coordinates. We can think of this as the standard position for our vehicle, going straight ahead, not rolled to the left or right.
Now this picture shows a real cube in the same position, but angled down a bit. This represents the vehicle, banking a bit to one side (banking left, in fact, since the +X is toward us.
The key insight here, and it took me a while to see it, is that the roll angle we want is the angle between the two rods in that picture. To rotate to that angle, we want the
rotationbetween those two rods. If the given normal in the input data is in the variablenorm, then we want llRotBetween(<0,1,0>,norm). Why? Because the y-face normal of the transparent cube is <0,1,0>, because it sticks straight out in the Y direction.Thoughts on learning
Why did it take me a while to see something so obvious? Well, I’m out of practice with rotations, and so I have to learn all over again how to think about them. Or I was just looking at things in a too complicated way. I went through a series of steps and was getting close to the answer. I’d worked for an hour or so setting this up and experimenting on the first day, and had nothing that was working. The next morning, as I was lying in bed thinking whether to get up, suddenly I thought
llRotBetweenand knew that was the secret. A mind is a terrible thing to waste, so I got up and tested the idea.I started thinking that, well, I wanted the angle of the rod from vertical, so I used llRotBetween(<0,0,1>,norm), which was off by 90 degrees too far, tilting my cube too far around. I cleverly compensated for that by just rotating it back by 90 degrees, which actually worked. I didn’t like that code, with the extra rotation by a constant and finally it came to me to use the actual normal from standard position against the provided normal.
Why do I mention all this wrong thinking? I could just show you my final very clean solution and you could all be amazed. I’d rather make it clear that even very experienced programmers sometimes don’t just automatically know the right answer. So if you find yourself confused, or with a messy answer, I suggest that you don’t give up. Maybe take a break, but keep thinking, trying, improving. In time, you’ll get to a decent solution.
One more thing: once I have a solution, I save the code so I don’t lose where I am. But I try to look at the code with unbiased eyes. This code isn’t automatically right, or best. I try to stay aware that it could be better, and to find ways to make it better by my standards.
This is even more important when my code doesn’t work, and I think it should. When I’m so sure it should be working, but it isn’t, well, the code is wrong. It’s barely possible that there’s a bug in the scripting language. Even if that is the case, and it never is, we still have the same problem, making our script work. We can be pretty sure that there is a way, and our job is to find it. So we need not to stay married to our current ideas. I find taking a break helps me a lot. Maybe that will help you as well.
Using our insight
My first step in the script was just to position the cube at each location around my little track. That was easy enough, as shown above in my
move_tofunction.Next, I needed to rotate my cube so it was always X-forward, going around the track, but level, like a train might be. I did that with two tricks. First, I considered the direction from whatever cube I was on to the next, and the direction back to wherever I had come from. I have a function,
toLookSoberlyAt, which given where you came from, points you at where you’re going. On my example track, this was just right. The function, by the way, was originally given to me by Annie Obscure, who still exists on the internet but doesn’t come into SL any more. Annie is very smart and was kind enough to give me this function:vector unitX = <1.0, 0.0, 0.0>; rotation toLookSoberlyAt(vector end, vector start) { vector target = end - start; vector shadow = <target.x, target.y, 0.0>; rotation flat = llRotBetween(unitX, shadow); rotation upward = llRotBetween(shadow, target); return flat*upward; }I think this isn’t quite the version Annie gave me, but one that I wrote based on the one she learned. We won’t look at it in detail but basically it considers a point toward your target (which might be up or downhill), but level with you. That’s what the
shadowline is doing, making a point along your track but right in front of you. The rotationflat' then points you toward that point, and then the rotationupward` tilts you up to look at the actual target. But we haven’t set any roll, around our Y axis, so we’re level in roll, but have our pitch and yaw correct.Once we’ve got that rotation, which we’ll use to position our cube vehicle as we go around, we can also use it to convert our provided normal, which is based on a rotated cube as we go around the track, to the standard position.
We need the standard position so that we can get the
llRotBetweento work. So we have to subtract out the planned rotation, long enough to get the roll rotation. That’s confusing to think about. To me, rotations always are. Let’s look at the code that does the whole job, as I have it right now.move_to_pos(integer to) { integer next = to + 1; integer prev = to - 1; vector target = get_vec(to); vector forward = get_vec(next); vector backward = get_vec(prev); rotation flat_rot = toLookSoberlyAt(forward, backward); vector norm = get_face(to); rotation roll = llRotBetween(<0,1,0>, norm/flat_rot); rotation final_rot = roll*flat_rot; vector pos = start + target; llSetLinkPrimitiveParamsFast( link(), [PRIM_POSITION, pos, PRIM_ROTATION, final_rot]); }Let’s go through that bit by bit. The integer
tois the index in our table of where we want to go. We computenextandprevto get the one we’re coming from and the one we’re going to, because that’s the basic direction we want to point. We fetch all those values, intotarget,forward, andbackward. We use ourtoLookSoberlyAtto compute the flat rotation we need, the rotation of our vehicle before we roll. We fetch the normal vector into norm, and compute the roll with this line:rotation roll = llRotBetween(<0,1,0>, norm/flat_rot);Notice that we divide
normby ourflat_rot. That backs out the rotation that’s baked into the provided data, converting the normal vector to our standard position. (Remember, dividing by a rotation is like subtracting it from the other one.)Then we save the rotation between standard zero (<0,1,0>) and norm, as
roll, the rotation needed to roll. So we get our final rotation as the roll plus the flat rotation, which of course uses*in rotations, to confuse us:rotation final_rot = roll*flat_rot;We offset our target by the starting point (remember, we made our adjusted list be zero-based), and move the object:
vector pos = start + target; llSetLinkPrimitiveParamsFast( link(), [PRIM_POSITION, pos, PRIM_ROTATION, final_rot]);Sure enough, it moves as intended. Here are pictures of the cube moving around my track:


Summing up
I’ve blathered on long enough. There are two take-home messages here, I hope. The first is that to compute our roll angle, given a face normal imported into SL from Blender, we need to compute the rotation between a standard flat face normal and our given one, which we do by computing the flat rotation at that point, and then dividing it out of the given Blender normal, then compute the
llRotBetween. That’s a trick we should keep in mind: normalize the position of our object by dividing out its special rotation, then measure the info we want, in this case, the difference between the provided face normal and the standard.But the second take home is more important to me. I try always to hold on to my current ideas rather loosely. They may be my best idea so far, but they’re not always right, and they’re not always ideal. So I keep an open mind to new solutions, and I let my subconscious mind bubble up ideas for improvement.
If I find myself looking at code that doesn’t work and thinking “But it has to work!”, I’m stuck. Reality is reality, even in Second Life, and when it doesn’t work, the code is wrong. So I have to get unstuck. I’ll do anything to get unstuck, including deleting all my code and starting over.
Anyway that’s the story of my Y Face Normals. I hope you find it helpful and I’m open to comments.